Remote Controlling an HP 1670G Logic Analyzer with a Linux PC X Server
- Introduction
- Reserving a fixed IP address for the logic analyzer
- Assign the chosen IP address to the logic analyzer
- Allow the logic analyzer to access your Ubuntu X server
- Configure the X-window Settings on the logic analyzer
- Install and declare the HP logic analyzer font files
- Connect your logic analyzer to your Linux PC
- Troubleshooting - remote session crashes
- Troubleshooting - FTP transactions not working
- References
Introduction
Earlier this year, I bought a pristine HP 1670G logic analyzer at the Silicon Valley Electronics Flea Market.
Produced sometime early 2000, it’s new enough to have an Agilent sticker. Unlike most other HP logic analyzers, a 1670G doesn’t have expansion cards: what you see is what you get, but 136 channels that can be sampled at 500MHz is plenty, and my machine has the 2 channel oscilloscope option. A bandwidth of 500MHz and 2GSa/s sampling rate are very nice specs.
The 1670G is one of the last HP models that runs on a custom operating system, later models switched to HP/UX, but it already has some advanced features, such as being to operate the UI through an external X Window server. And that’s great because operating the UI with the keys and rotary knobs on the front panel is not a pleasant experience. You can connect a keyboard and mouse, but who has extra space for that on their bench or equipment cart?
It used to be easy to have any kind of X client connect to a remote X server. Back in the early 1990s on the HP Apollo workstations in college, it was a simple matter of setting the DISPLAY environment variable, but that was before network security was a concern. Things are bit more complicated now, and it took me a couple of hours to get the remote X server connection up and running on my Ubuntu 20.04 machine.
In this blog post, I got through the steps that were required to make it work so that I won’t forget the next time I need it.
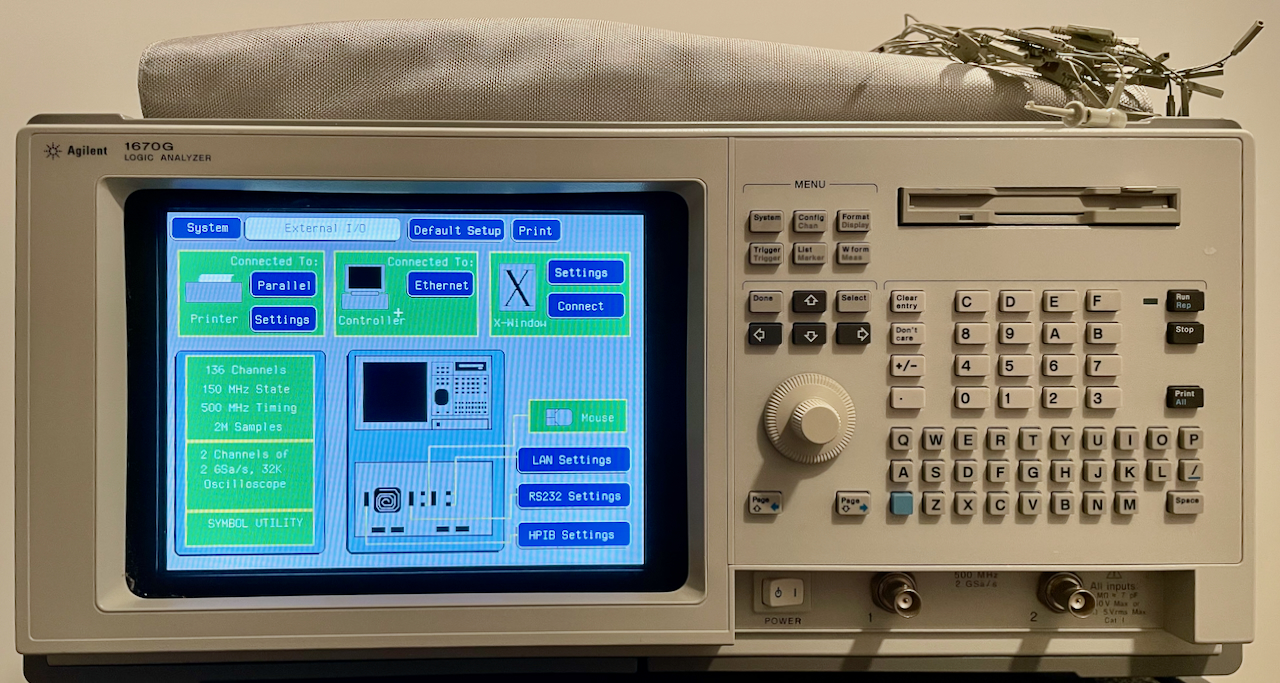
 Logic analyzer showing that it’s connected to an external X server.
It all feels very hacky, and there’s absolutely no guarantee that my solution will work on your machine.
Reserving a fixed IP address for the logic analyzer
Like most other people, all of my household’s PCs, laptops, and IOT devices are assigned a dynamic IP address with DHCP. The 1670G, however, only supports a static IP address.
Luckily, my router, an Asus RT-AC88U, has the option to reserve a static IP address for a particular Ethernet MAC address.
If your router doesn’t supported static IP reservation, don’t worry too much. Even though DHCP assigned IP addresses are dynamic, they often stay the same for a long time. Just choose an address that’s different that all the others and hope for the best. You probably won’t be using a machine like this 24/7…
Step 1: Determine the Ethernet MAC address of the logic analyzer
You can do this as follows:
- System config screen -> External IO -> LAN settings -> Factory Settings
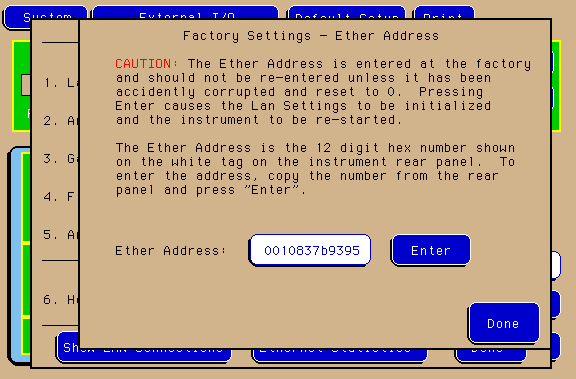
Write down the Ethernet MAC address. In my case, it’s 00:10:83:7b:93:95. You should also be able to find this number on a sticker on the back of your machine.
Step 2: Find the IP address of the machine with the X server
This is probably the Linux machine on which you’re reading this… (It also works on a Windows machine with an X server, but you’ll have to figure that out yourself.)
tom@zen$ ifconfig
...
wlp5s0: flags=4163<UP,BROADCAST,RUNNING,MULTICAST>  mtu 1500
  >>>>> inet 192.168.1.51  netmask 255.255.255.0  broadcast 192.168.1.255
        inet6 fe80::7491:3d2f:f191:a182  prefixlen 64  scopeid 0x20<link>
        ether 78:2b:46:be:5d:f7  txqueuelen 1000  (Ethernet)
        RX packets 7543776  bytes 5725183269 (5.7 GB)
        RX errors 0  dropped 122599  overruns 0  frame 0
        TX packets 1707142  bytes 336828263 (336.8 MB)
        TX errors 0  dropped 0 overruns 0  carrier 0  collisions 0
...
My PC’s IP address is 192.168.1.51.
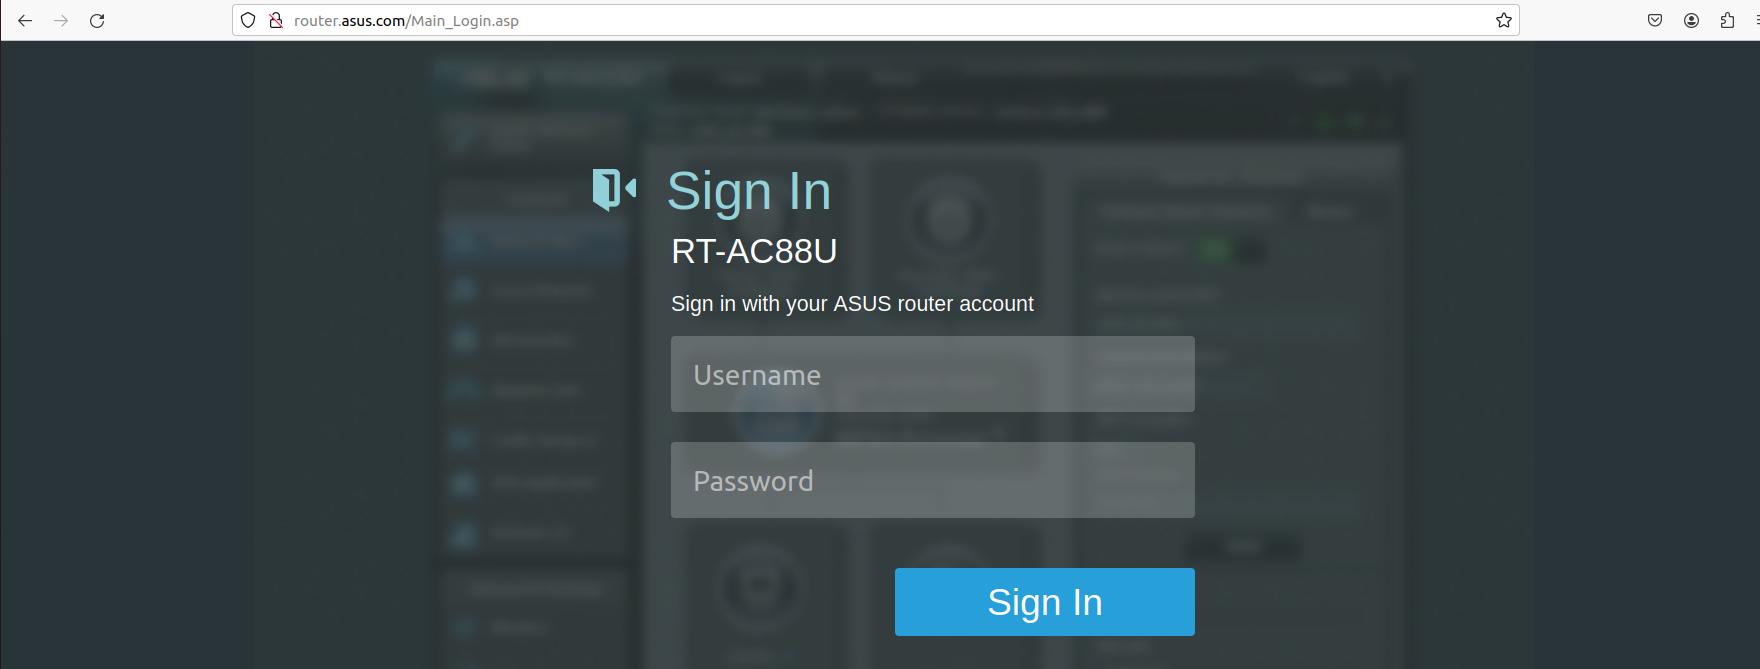
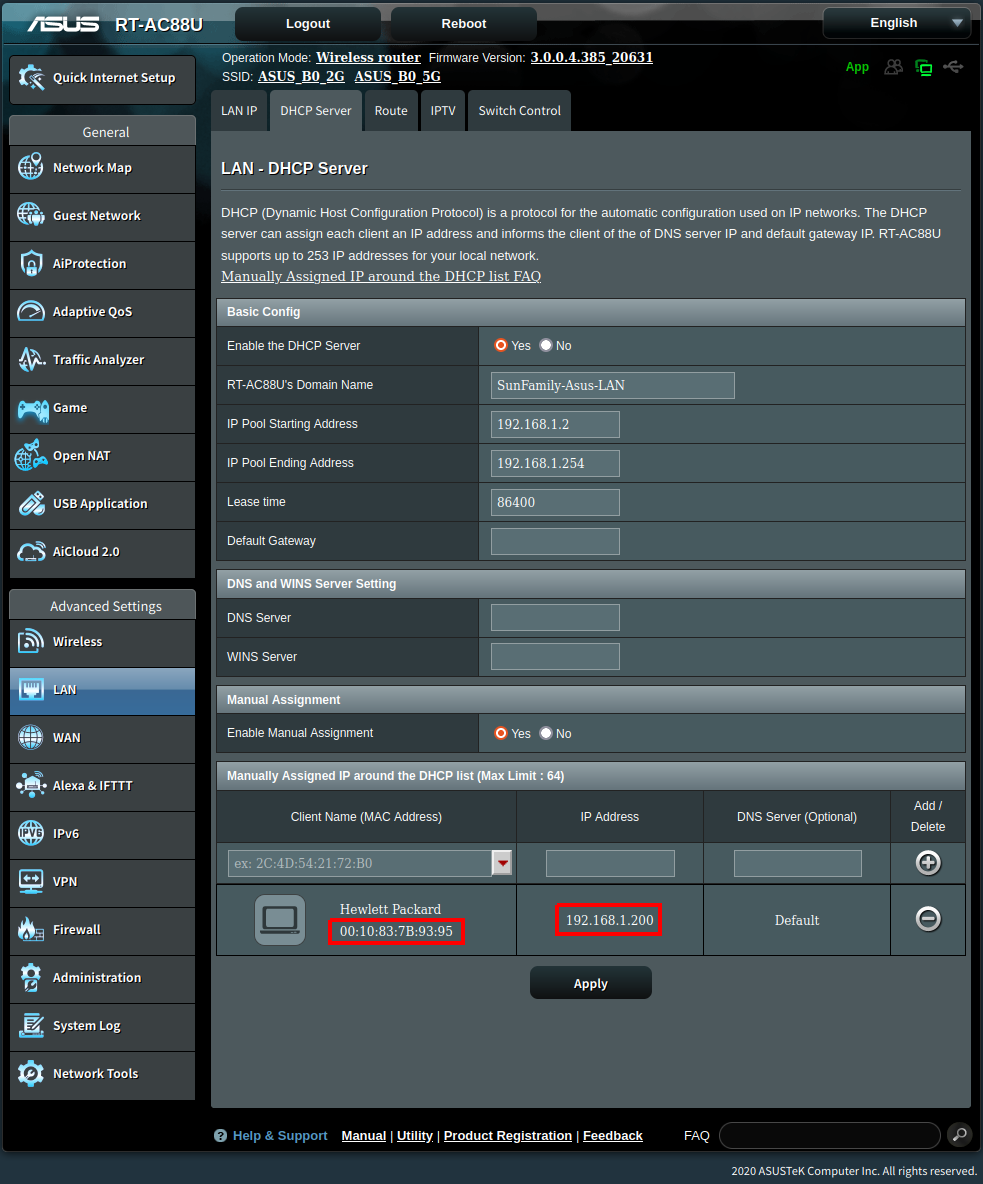
Step 3: Log in to Router
Your router is usually assigned the IP address of your machine with the last number changed to 1. In my case, it’s 192.168.1.1. You point your browser to that address.
After logging in, assign a fixed IP address for the logic analyzer:
 Click to enlarge
This screen will obviously look different if you have a different router.
I filled in the MAC address and an IP address of my own choice: 192.168.1.200.
The router was able to figure out by itself that the specified MAC address is owned by Hewlett Packard.
Assign the chosen IP address to the logic analyzer
Step 4: Fill in the LAN settings
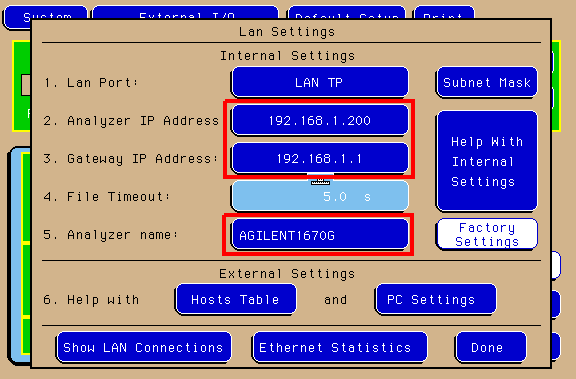
- Make sure that the LAN port is set to “LAN TP” (for twisted pair), because the logic analyzer also supports the old school BNC connector.
- Fill in the chosen IP address: 192.168.1.200.
- Fill in the IP address of the router: 192.168.1.1
- I changed the file timeout to 5.0s, but I don’t think this was necessary.
- Fill in a name of the device. This name will show up at the top of the X window.
I didn’t touch any of the other values.
Allow the logic analyzer to access your Ubuntu X server
This took me hours to figure out. Chances are high that you’ll have to do something different…
Step 5: Install socat
socat is “a multipurpose relay tool for Linux”. It’s an abbreviation of “SOcket CAT” and
creates a bi-directional link between two different sockets… I think?
On Ubuntu, I just ran sudo apt install socat.
Step 6: Determine your current X window display number
tom@zen$ echo $DISPLAY
:1
In my case, the display number is :1.
Step 7: Open up your firewall to receive X client TCP/IP requests
The logic analyzer X client will send X server request for particular, user defined display. I chose 111 as the external display number. Don’t try to find meaning behind this number, you can use pretty much any number.
The logic analyzer will send X server request to TCP/IP port 6111 for display number 111.
We need to tell the firewall to allow packets from the logic analyzer IP address to this port to come through:
sudo ufw allow from 192.168.1.200 proto tcp to any port 6111
Step 8: Route incoming X server TCP request to your current display
This was the key incantation to made everything work for me.
Logic analyzer requests to port 6111 are rerouted to the active X display with socat:
socat TCP-LISTEN:6111,fork,bind=192.168.1.51 UNIX-CONNECT:/tmp/.X11-unix/X1
There 3 key values here are:
-
6111
the external X server port.
-
192.168.1.51
the IP address of my Linux machine.
-
/tmp/.X11-unix/X1
The 1 of X1 is the display number that I determined in step 6.
Configure the X-window Settings on the logic analyzer
Step 9: Set the remote X server parameters
Go to the X-Window Settings configuration screen:
- System -> External IO -> X Settings
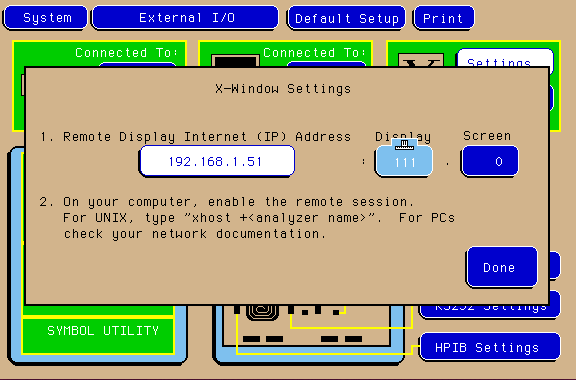
Fill in the IP address of your Linux machine and the display number, the same 111 as used above.
Install and declare the HP logic analyzer font files
This is super important: your logic analyzer will crash if you don’t do this!
HP provides special font files for your X server. They can be found on the hard drive
of the logic analyzer in the \SYSTEM directory. You need the following files:
LG165.BDF
SM165.BDF
README
You’re supposed to copy these files from the logic analyzer to your local machine with FTP, but
FTP didn’t work for me at the time so I used a floppy disk instead. I’m making the 3 files available here for
download. Just click on them here to grab them:
LG165.BDF, SM165.BDF,
README, and store the files on your Linux machine’s file system.
The README explains what to do. It boils down to this:
cd <directory with the 2 font files>
mkfontdir
xset +fp `pwd`
xset fp rehash
You will need to redo the last 2 command after each reboot.
The README also has instructions on how to make these font changes permanent, but that didn’t work on my machine.
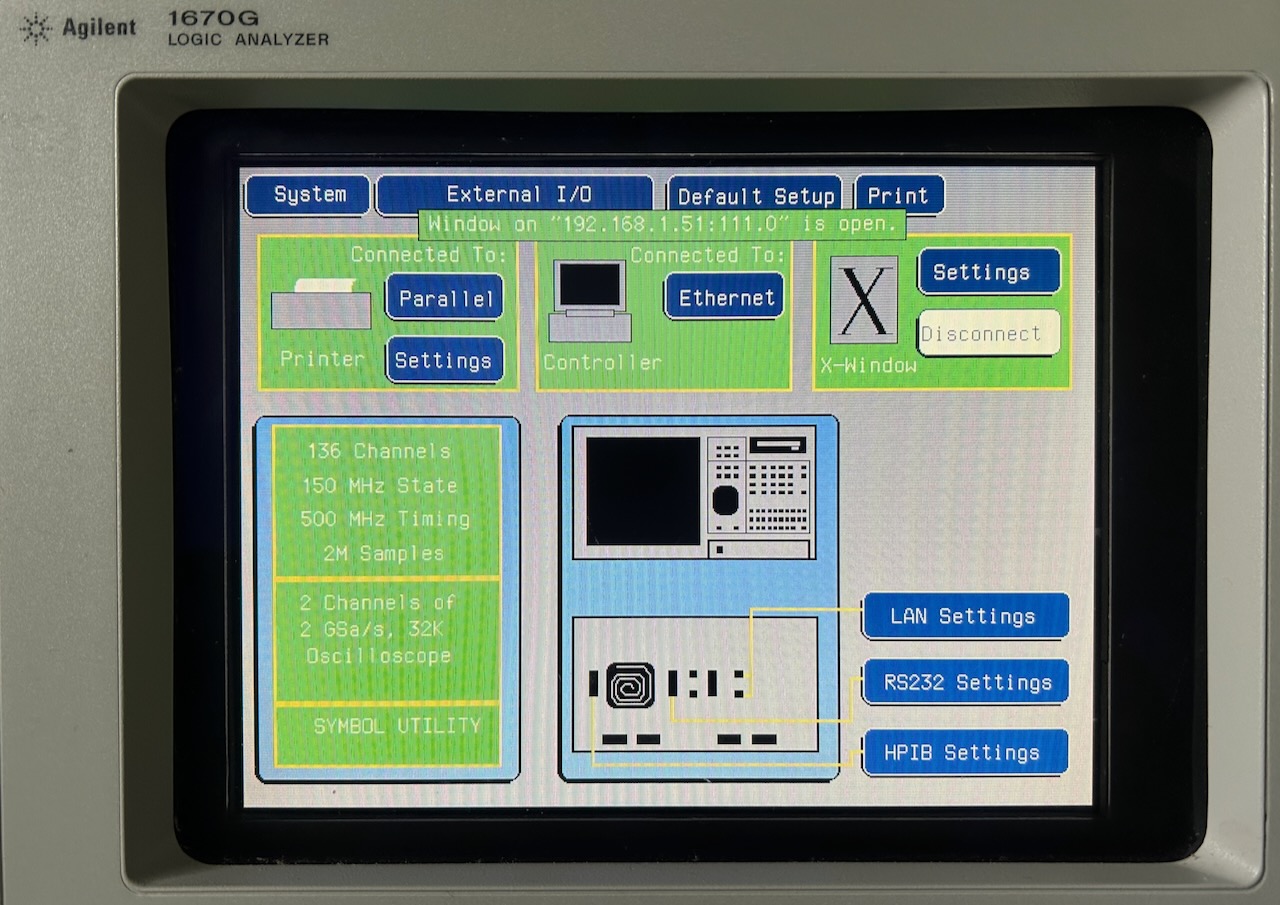
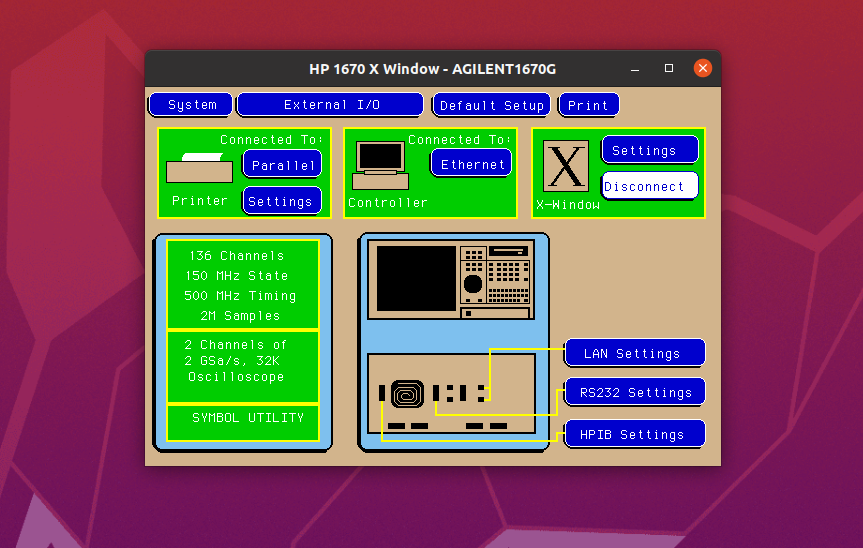
Connect your logic analyzer to your Linux PC
- System -> External IO -> X-Window Connect
If all goes well, you should see the logic analyzer screen on your desktop:
Troubleshooting - remote session crashes
Your logic analyzer may show the following image and error message:
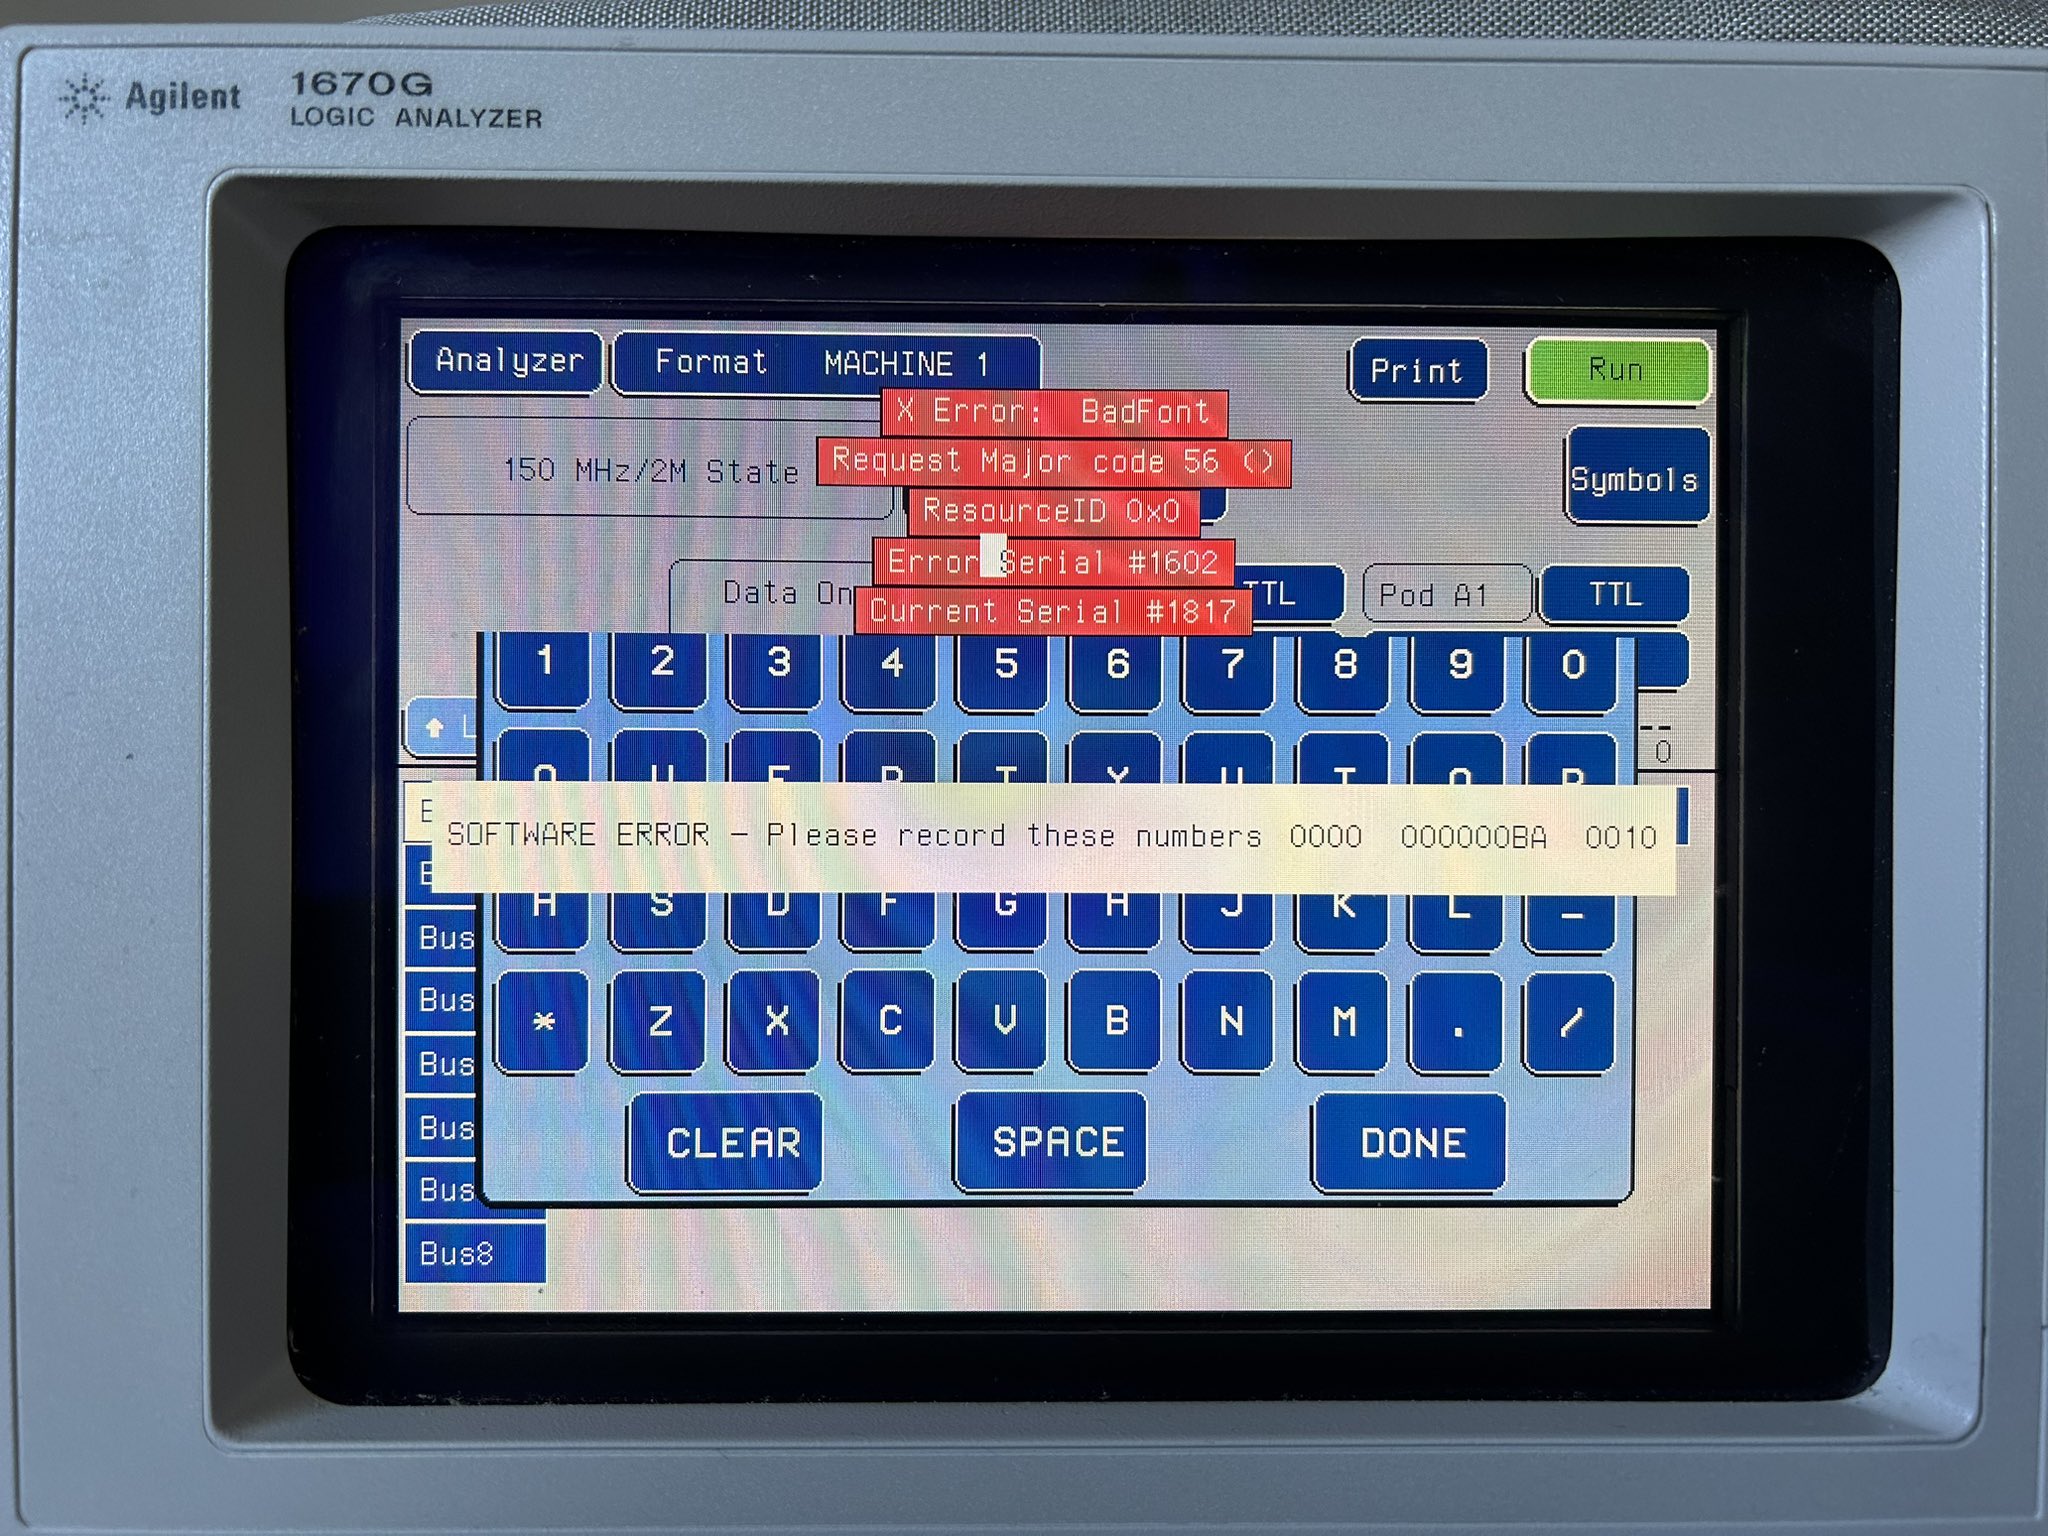
X Error: BadFont
Request Major code 56 ()
ResourceID 0x0
Error Serial #1602
Current Serial #1817

SOFTWARE ERROR - Please record these number XXXX XXXXXXXX XXXX
If you see this, check if the font files were installed correctly. I didn’t do that at first and got this message all the time. It went away for good after installation of the fonts.
Troubleshooting - FTP transactions not working
This is not directly related to X server remote control, but I need to put it somewhere.
On some of my machines, ftp is not working. Here is what you’re supposed to see:
Connected to 192.168.1.200.
220    167XG V03.02 FUSION FTP server (Version 3.3) ready.
Name (192.168.1.200:tom): data
230 User DATA logged in.
ftp> dir
200 PORT command ok.
150 Opening data connection for  (192.168.1.51,41623).
dr-xr-xr-x    2    1    1       766  status
dr-xr-xr-x    4    1    1       894  system
dr-xr-xr-x    3    1    1       766  slot_a
dr-xr-xr-x    3    1    1       766  slot_b
226 Transfer complete.
ftp>
However, on my main Linux machine, it hangs immediately after issuing the dir command.
In this case, dmesg reports this:
[UFW BLOCK] IN=wlp5s0 OUT= MAC=... SRC=192.168.1.200 DST=192.168.1.51 LEN=44 TOS=0x00 PREC=0x00 TTL=240 ID=1894 PROTO=TCP SPT=20 DPT=50021 WINDOW=0 RES=0x00 SYN URGP=0
This is telling me that the UFW firewall is block packets. The key info here is:
SRC=192.168.1.200 ... SPT=20
Packets from the logic analyzer that are coming from port 20 (ftp!) are blocked.
The reason is due to the way FTP traditionally used to work: the client (my PC) creates a control connection FTP port of the server (the logic analyzer) to send command, and the server opens a data connection to send back data. This is called FTP ‘active’ mode. The problem is with this is what I’m experiencing: my firewall is blocking those incoming request to port 20.
There’s also FTP ‘passive’ mode: in this case, the FTP client also opens the TCP data connection, which makes the firewall happy. Unfortunately, the logic analyzer doesn’t support passive mode.
I can tell UFW to allow all packets from a given source IP address, but I can’t tell it to only allow packets from source port 20.
So my current solution is very crude:
sudo ufw allow from 192.168.1.200
This allows all traffic coming from the logic analyzer… or any device that pretends to be one. It’s not ideal, but I don’t use ftp very often so I only enable this rule when I need it.
To disable, do the following:
sudo ufw status numbered
Status: active

     To                         Action      From
     --                         ------      ----
...
[ 8] 6111/tcp                   ALLOW IN    192.168.1.200
[ 9] Anywhere                   ALLOW IN    192.168.1.200
...
Then delete the rule:
sudo ufw delete 9
Deleting:
 allow from 192.168.1.200
Proceed with operation (y|n)? y
Rule deleted
There are some alternative solutions:
-
Add an iptables rule for
nf_conntrack_ftp.Here is an explanation on how to do that.
-
Add an FTP-specific rule to
/etc/ufw/before.rules, as described here
I didn’t try those to solutions, but they might be handy for a permanent setup.
References
-
The Resistor Network - A Testament to X11 Backwards Compatibility
The blog post title is not on point, but it discusses remote control of an HP 1670A logic analyzer by using the more traditional way. I was not able to get this method to work on my more modern Ubuntu machine.
-
Another blog post that discusses setting up the closely related HP 1670D, though not specifically focused on X Window connectivity and FTP. Replacing the spining metal hard drive by a flash drive is something that I might do in the future…
Various 1670G info